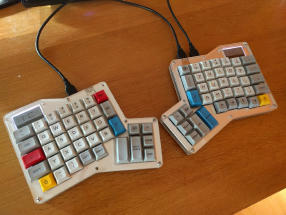
My choice landed on the Ergodox Infinity keyboard. It's a split keyboard that comes in two halves, and because it's not mass produced (yet?), you can only buy a kit, that you assemble yourself. I knew nothing about soldering, so I just watched a few videos to get a hang of how hard it would be, and it didn't seem that frightening. I also had access to a lab with all the equipment, and some helpful coworkers, so I went ahead and bought it. I ordered it through massdrop.com, which is basically a "group buy" site, the more people buying the product, the lower the price will be, which sounds great, but the downside is the time it takes to ship. The group buy has to end, then massdrop sends out the orders, and only then does manufacturing begin, and the packages will ship out afterwards. I waited 4 months, from the time I placed the order, to the time I actually got my hands on it.
Pricing and assembly
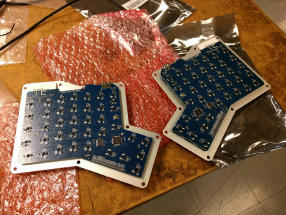
The board cost $199 with cherry mx brown switches, and no keycaps. Shipping was an extra $25 to Hungary (from the US). When purchasing you have the option of adding blank keycaps, a keypuller, and sometimes you can also request assembly as well, not sure what the pricing was on those. The kit is basically a bag of switches, a few layers of acrylic plates, a metal plate, a USB cable for connecting the two halves, and another one for connecting to the PC, plus a few binding screws.
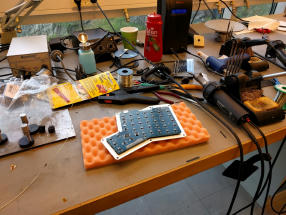
Assembling the kit was quite easy, even for someone with no prior soldering experience, there is a whole tutorial, and an assembly video on the input club page. The process is, put the metal plate on top of the PCB, seat in a switch, solder it, repeat 76 times, then put the bottom acrylic plates on top of each other in order, seat in the PCB, put the top acrylic layers on. Amusingly enough, I spent quite some time figuring out the ordering of the acrylic plates, they are not marked, and there is 8 layers. After that you plug in the board, and it's ready, provided you didn't mess up soldering.
Soldering is only needed for the switches, everything else (like resistors) are already on the PCB. You have to solder 2 points for every switch, and there are 38 switches you have to solder for both halves. Even with absolutely zero prior soldering experience, I managed to get every button working on the first try, however I did mess up something else. The acrylic plates have a very thin paper cover glued onto them as scratch protection. Some parts of the acrilyc is extremely thin and small, and I managed to break off a small piece, that I had to glue back with superglue, so be very careful when peeling those off.
Features, ergonomics, and overall feel
The firmware for the board is called kiibohd, and it defines its own language for defining layouts, called KLL. For someone with programming experience, it is very easy to pick up, and start customizing your own layouts. The firmware supports 6 "stackable" layers, which basically means that multiple layers can be active at the same time, and if a key has no binding on the "latest" one, it will use the one on the next layer (like a fall-through mechanism). The firmware has support for defining combinations, which is for example, pressing two keys at the same time to produce a different output, and sequences, eg. typing "abc" after each other produces a something. There is no easy way of importing/exporting your layout, you have to maintain a fork of the firmware repository.
I really like that there are 3 different ways of switching the layers:
- Latch: You press the layer switch button, and it will only affect the next keypress, it will revert back to the previous layer after that
- Stick: You press the layer switch, and the layer will stay active until you press it again
- Hold: The layer stays active as long as you hold the button, like a modifier key
The board uses an orthogonal layout. What this means is that the buttons are laid out in a columnar way, in contrast with the more popular staggered layout, where the keys are more in a zig-zag pattern. The orthogonality helps with making less typos, because it emphasizes that each key is meant to be hit with a specific finger. My personal impression is that it's nicer than the staggered layout, however, you will have to learn the correct way of typing with 10 fingers to proficiently use it. My typing speed fell to ~50 WPM in the beginning, I had to spend a few months until it got back to the usual ~110. This might not be obvious at first, and you will only find out when you try to hit G with your right hand, only to hit the desk inbetween.
Ergonomically, the infinity is terrible, there is really no way around it. It's a board that promotes itself as being ergonomic, but there are 4 major flaws with it.
- The thumb cluster is absolutely inaccessible
- The 3-3 keys that are in the center of the bottom row are also not accessible
- The board does not have any kind of tenting
- The P button is just not reachable with your pinky
The thumb cluster is the most useless thing I have ever used. You can comfortably reach 2 keys (the 2 large ones), the rest is just impossible. Even the pgup/pgdown/home/end/insert/delete cluster on a normal 100% keyboard is more accessible than this. The idea of having an orthogonal layout is that you only move your fingers up-down, and not left-right, but the thumb clusters absolutely defeat this, and the 3-3 keys on the bottom are not usable without making large movements with your hands, it absolutely throws off my typing rhythm.
The board has no tenting at all. It just lays flat on the desk, so you have two options: a) get some kind of wrist pad that elevates your hands, or b) tent it with something. I ended up buying some tall hex screws, and using those at the top of the board. Regarding the third point, the correct 10 finger typing dictates that you are supposed to hit P with your right pinky, but that is just so far away, that you can't really generate enough power without moving your hand to the right, which again goes against orthogonality.
Problems with non-US layouts
I'm not going to chalk this up as a con, but this is something that is really not obvious at first. You won't encounter this problem if you use the US layout.
There are not enough buttons for having a Hungarian or a Norwegian layout (possibly not for any European layout?). My main board that I use is an ANSI 60% board called a Poker3. It has 61 buttons, and it comfortably handles the Hungarian layout (which has 9 extra vowels), there is only one letter that I need to reconfigure. The ergodox, even with having more buttons (76), cannot fit the Hungarian layout, due to two reasons:
- The unusable keys effectively make the board have 14 fewer keys
- Some keys are moved from their default locations, to the "inner" part of the halves
I need 2 keys on the right side of the zero key, and 3 keys on the right of P. I have tried using the US International layout which has dead keys, but that layout is batshit insane. Some keys require combinations like '+shift+3. I ended up moving the accented Hungarian characters to a separate layer, that is accessible by holding the bottom right button, but it's extremely far from usable, I can't type faster than 50 WPM in Hungarian. You really really don't want to put common characters on a non-default layer.
Verdict
I can't recommend this board, sorry. If you are only typing in English with the US layout, then it might be a good fit, but I absolutely advise trying it somewhere before buying. The thumb cluster and the tenting are two problems that I would definitely not expect from a $200 board. Comparatively, a Poker3 costs $139, and while it's not a split keyboard, it definitely outperforms the ergodox for me, and has a more solid construction than the acrylic plates that the ergodox comes with. You also don't have the problem of finding keycaps, the Ergodox uses 12 pieces of 1.5u keys, which you will be paying extra for, on a market the is already premium priced.
I am selling the ergodox, contact me if you are interested, and you are in Europe. I'm expecting around $170 + shipping for it. Sold.